
With cost centres, your users assign their bookings directly to one of your company’s cost centres. This lets you track later which department or project used a resource.
- You decide which resources require a cost centre, e.g. specific rooms, desks, a recording studio or similar.
- Optionally, you can assign default cost centres to users to make booking easier for them.
1. Set up cost centres in the system
- Activate “Cost centres” in the system settings.
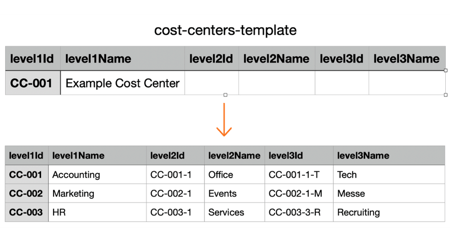
- Download the CSV template.
- In the template, enter all the cost centres that should be selectable in your company. You can create up to three hierarchy levels, each with an ID and a name, e.g. Marketing › External Communications › Events.
- Upload the file and save your settings. If you want to change your cost centres later, simply upload a new file via “Replace”.
 Tip: You can also transfer and maintain cost centres via the API. This is particularly worthwhile if you have a large number of cost centres or if they change regularly.
2. Define which resources require a cost centre
You decide which bookings require a cost centre, e.g. only certain meeting rooms.
- In the admin area, go to “Plans” and open the plan you want.
- Click on the resource, e.g. a desk or a meeting room.
- Activate the “Cost centre required” toggle and save your changes.
Important: Cost centres are only requested for resources where this has been enabled, so bookings don’t become unnecessarily complicated.
3. Assign default cost centres to users
Assign default cost centres to users to make booking easier for them. The default cost centre is preselected automatically but can be changed when booking. All cost centres from your upload are available to choose from.
There are three ways to assign default cost centres to users:
- Bulk import via CSV file: Export the user list in User management, enter the cost centre in the relevant column and import the file again.
- Edit individual users: Open the user in User management and select the appropriate cost centre under “Default cost centre”.
- Via API: You can also transfer default cost centres to desk.ly via the API.
Good to know: Users cannot change their default cost centre themselves.
What users see when booking
- For resources that require a cost centre, the “Cost centre” field appears as a mandatory field in the booking window.
- If a default cost centre has been assigned to the user, it is already selected but can be changed.
- Only cost centres at the lowest hierarchy level can be selected. Higher levels are there for orientation.
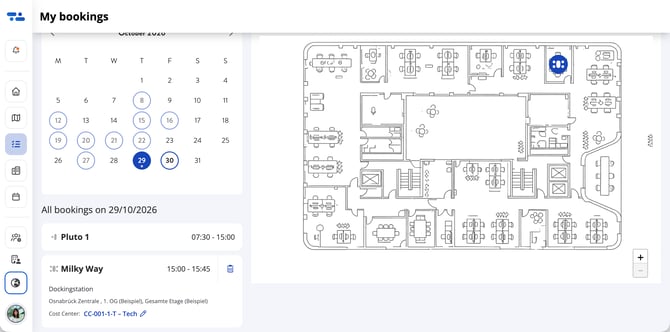
- The cost centre also appears under “My bookings”, where it can still be changed until the booked period begins.
 Available with Enterprise Plus. Contact us for no-obligation information about upgrading.
Any more questions?
You can contact our support team at any time by email (support@desk.ly). From Monday to Friday, 9 am to 4 pm, you can also reach us via live chat and/or by phone on +49 541 9625 9040.